5 Tips to Keep your Succulents Alive

Succulents are a popular choice for indoor plants because they are easy to care for and require minimal maintenance. These hardy plants are native to arid climates, so they are well-suited to life indoors. With proper care, succulents can thrive and provide a beautiful addition to your home. Here are some tips for caring for succulent plants:

Photo by Designecologist on Pexels.com
  1. Choose the right pot.

Succulent plants prefer to be grown in pots that have drainage holes, as this allows excess water to drain out of the soil and prevents the roots from becoming waterlogged.

Avoid using pots that do not have drainage holes, as this can lead to root rot and other problems.

In general, a pot that is slightly larger than the plant’s root system is a good choice

2. Use the right soil.

The type of soil that you use can have a big impact on your succulent’s health.

Succulents prefer well-draining soil that contains a mix of organic matter and inorganic materials.

Avoid using potting soil that is too dense or heavy, as this can retain too much moisture and harm the plant.

Instead, look for a soil mix that is specifically designed for succulents or cacti.

3. Provide adequate light

Succulent plants need light to photosynthesize and grow, so it is important to provide them with enough light to thrive.

The amount of light that a succulent needs depends on the species, but most succulents do best in bright, indirect light.

Avoid placing your succulent in a location that is too dark or too sunny, as this can harm the plant.

If you are unsure about the light requirements for your succulent, you can consult a gardening guide or ask a plant expert for advice.

4. Water your succulent properly

Overwatering and underwatering are two of the most common mistakes that people make when caring for succulent plants.

To avoid these issues, make sure to water your succulent according to its specific needs.

Most succulents prefer to be watered deeply and then allowed to dry out completely before watering again.

A good rule of thumb is to water your succulent when the top inch of soil feels dry to the touch.

Avoid watering the plant too frequently, as this can lead to root rot and other problems.

5. Prune and groom your succulent

Regular pruning and grooming can help your succulent stay healthy and look its best.

Pruning can remove dead or damaged growth and encourage new, healthy growth.

To prune your succulent, use clean, sharp scissors or pruning shears to cut off any dead or damaged leaves or stems.

Groom your succulent by removing any yellow or wilted leaves, and dusting off the leaves to keep them clean.

This will help your succulent to absorb more light and look more attractive.

  1. .

DIY Indoor Plant Decor Ideas: Spruce Up Your Space with These Playful Plant Projects

Are you looking to spruce up your living space with some greenery? Indoor plants are not only great for purifying the air, but they can also add a touch of style and personality to any room. In this blog post, we’ll share some playful DIY indoor plant decor ideas that you can easily make at home.

1. Macramé Hangers:

Macramé hangers are a stylish and versatile way to display your plants and add some natural beauty to your home. These plant hangers were popular in the 1970s and have made a big comeback in recent years, with their intricate knots and bohemian charm.

To create your own macramé hanger, all you need is some rope, scissors, and a pot. You can use a variety of materials for your rope, including cotton, jute, or even recycled t-shirts. Begin by cutting your rope to the desired length, taking into account the height of your ceiling and the length you want your hanger to be.

Next, tie a knot at the top of the rope, leaving enough room for the pot to sit comfortably. You can then start knotting your rope in a series of knots, either using a simple pattern or a more intricate design. There are many macramé tutorials available online to help you get started.

Once you’ve reached the desired length, you can add your plant pot to the hanger, making sure it is secure and balanced. You can create a simple knot or use a decorative wrap to tie off the hanger at the bottom.

Macramé plant hangers can be hung from the ceiling, a hook on the wall, or even from a tree branch outside. They are a great option for those who want to save floor space and add some natural beauty to their home décor. So why not try creating your own macramé hanger today and give your plants the attention they deserve?

2. Terrarium:

Terrariums are a delightful way to bring the beauty of nature indoors, especially if you have limited space. These self-contained ecosystems can be created in a variety of glass containers, including jars, bowls, and even light bulbs, and can feature a range of plant species, from succulents and cacti to ferns and mosses.

To create your own terrarium, you’ll need a few basic supplies: a glass container, some small rocks or pebbles, activated charcoal (optional), potting soil, and, of course, your favorite plants. Begin by layering the rocks or pebbles on the bottom of the container. This helps with drainage and prevents water from sitting in the soil and causing root rot.

Next, add a layer of activated charcoal if desired. This helps to filter the air and prevent mold from growing inside the terrarium. Then, add a layer of potting soil, making sure to leave enough space for your plants to grow. Gently plant your chosen plants, arranging them in a way that creates a visually pleasing composition.

Once your plants are in place, it’s time to add any decorative elements you like, such as small figurines, decorative rocks, or seashells. You can also add a layer of decorative sand or moss on top of the soil for added texture and interest.

Terrariums make for excellent conversation starters and can be displayed on shelves, tabletops, or even hung from the ceiling. They require minimal maintenance and are perfect for those who may not have a green thumb or who are short on time. So why not try creating your own terrarium today and bring a little piece of nature into your home?

3. Vintage Containers:

If you’re looking for a fun and creative way to add some personality to your indoor plant collection, consider repurposing old containers like teapots, mugs, or vintage planters. Not only is this an eco-friendly way to give new life to old items, but it also allows you to create unique and charming plant displays that reflect your personal style.

Teapots and mugs, for example, can make excellent planters for smaller plants like herbs, succulents, or small flowering plants. Simply fill them with soil and add your plant of choice, making sure to leave enough room for the roots to grow. This not only adds a quirky touch to your décor but also provides an unexpected twist on traditional planters.

Vintage planters, on the other hand, can be used to give your plants a nostalgic feel. Whether it’s an old tin can, a classic ceramic pot, or a retro metal planter, these repurposed containers can add a touch of vintage charm to your living space. Plus, they often have a unique character that newer planters just can’t match.

By repurposing old containers as planters, you can add a personal touch to your décor while reducing waste and giving new life to old items. So why not raid your cupboards or check out local thrift stores to see what hidden gems you can find? Who knows, you might just discover a new favorite planter that you never knew you needed.

4. Hanging Planters:

Hanging planters are a fantastic choice for anyone looking to add some greenery to their home without taking up too much floor space. Whether you live in a small apartment or simply want to keep your living areas clutter-free, a hanging planter can be a stylish and practical solution.

To create your own hanging planter, all you need are a few basic supplies: a basket or mesh bag, some twine, and, of course, your favorite plant. Choose a plant that is well-suited to hanging, such as a trailing vine or a spider plant, and make sure it has enough space to grow and thrive in its new home.

Once you’ve selected your plant, gently insert it into the basket or mesh bag, taking care not to damage its roots or leaves. Then, tie the twine securely around the top of the basket, making sure it is strong enough to support the weight of the plant. You can also add some extra twine or decorative ribbon to the top of the planter for an extra touch of style.

Finally, it’s time to hang your new creation! Choose a spot in your home that receives plenty of natural light and is easily accessible for watering and care. You can hang your planter from the ceiling using a hook or anchor, or attach it to a wall using a sturdy bracket or hanger. Once your planter is securely in place, sit back and enjoy the beauty and freshness it brings to your living space.

5. Test Tube/ Bottles:

Test tube plants and bottle planters are not only practical, but they can also add a touch of whimsy to your indoor plant collection.

Picture a row of delicate test tubes holding tiny, vibrant plants that seem to dance in the sunlight.

Or how about a vintage glass bottle repurposed as a hanging planter, showcasing a cascading vine?

With some creativity and a little bit of DIY know-how, you can turn ordinary glass vessels into stunning plant displays that bring life and joy to your living space.

Whether you choose to display them on a windowsill or hang them from the ceiling, test tube plants and bottle planters are sure to add a unique and charming touch to your indoor garden.

With these DIY ideas, you can create your own unique plant displays that reflect your personal style. So go ahead, get creative, and bring some greenery into your home!

Creating a Plant-Friendly Home Environment: Tips for Keeping Your Houseplants Healthy and Thriving

Hey there plant enthusiasts! Are you looking to create a home environment that’s perfect for your beloved indoor plants? If so, you’re in luck! By following a few simple tips, you can create a space that’s perfect for your plants to thrive.

One of the many benefits of having plants in your home is that they can improve the air quality and make your space feel more inviting and relaxing. But to keep your plants healthy and happy, it’s important to create a home environment that’s conducive to their growth.

So, what does a plant-friendly home environment look like? It’s all about paying attention to the basic needs of your plants and providing them with the right conditions to thrive. This might include choosing the right soil, providing adequate light and water, and maintaining a comfortable temperature.

By creating a home environment that’s perfect for your plants, you’ll be able to enjoy all the benefits of having plants in your space. Not only will your plants be healthy and happy, but you’ll also have the pleasure of enjoying their beauty and the many other benefits they bring.

Plant Types:

When it comes to caring for indoor plants, one of the most important things to consider is choosing the right plants for your space. Not all plants are well-suited to life indoors, so it’s important to select plants that are specifically designed for growing inside.

Before you buy any plants, make sure to consider the amount of light and temperature in the location where you will be placing them. Different plants have different light and temperature needs, so it’s crucial to choose plants that will thrive in your particular environment.

If you’re not sure which plants will work best in your space, don’t worry! There are plenty of options to choose from. Some popular choices for indoor plants include snake plants, pothos, and peace lilies. These plants are known for their ability to thrive in a variety of indoor conditions, making them a great choice for beginner plant parents.

So, take the time to choose the right plants for your space and you’ll be well on your way to a happy and healthy indoor garden!

Photo by Huy Phan on Pexels.com

Provide adequate light:

Without enough light, your plants may struggle to photosynthesize and thrive.

The amount of light that a plant needs depends on the species, but most indoor plants do best in bright, indirect light. This means that they should be placed in a location that gets plenty of light, but not so much that it scorches their leaves.

Avoid placing your plants in locations that are too dark or too sunny, as this can harm them. If you’re not sure about the light requirements for your plants, don’t worry! There are plenty of resources available to help you out. You can consult a gardening guide or ask a plant expert for advice.

So, make sure to give your plants the light they need to thrive. The right amount of light will keep your indoor plants will be happy and healthy.

Photo by Sigrid Abalos on Pexels.com

Temperature:

Did you know that the temperature of your home or office can have a big impact on the health of your indoor plants? Just like us, plants prefer to be kept at a comfortable temperature.

Most indoor plants prefer to be kept at temperatures between 60 and 75 degrees Fahrenheit. This may vary slightly depending on the species of plant, so it’s always a good idea to do some research or consult a gardening guide to determine the specific temperature needs of your plants.

One thing to be aware of is the location of your plants in relation to heating and cooling vents. Fluctuations in temperature caused by these vents can be harmful to your plants, so it’s best to keep them away from these areas.

Photo by cottonbro studio on Pexels.com

Watering:

One of the key ways to do that is by watering them properly.

But let’s be real, it can be tough to get the watering just right. It’s easy to either overwater or underwater your plants, which can lead to all sorts of problems. No one wants to see their beloved plants wilt or droop because they weren’t getting enough (or too much!) H2O.

So, what’s the secret to proper plant watering? It really comes down to understanding the needs of your specific plants. Some plants prefer to be watered frequently and consistently, while others prefer to dry out a bit in between waterings. A good rule of thumb is to check the top inch of soil for dryness before watering. If it feels dry to the touch, it’s probably time to give your plants a drink.

Remember, each plant is unique and may have different watering requirements. So, be sure to do your research and pay attention to your plant’s needs. With a little bit of TLC and the right amount of water, your plants will be happy and healthy in no time!

Photo by cottonbro studio on Pexels.com

Soil

As you probably know, the soil you use can play a big role in the health and well-being of your indoor plants. It’s important to choose the right soil for your specific plants, as different plants have different soil requirements.

When it comes to indoor plants, a well-draining potting soil that contains a mix of organic matter and inorganic materials is generally a good choice. This type of soil will help your plants thrive by providing the necessary nutrients and drainage they need.

But be careful! Avoid using soil from your garden, as it may contain pests or diseases that could harm your indoor plants. It’s always best to opt for a high-quality potting soil specifically designed for indoor use.

So, the next time you’re planting or repotting your indoor plants, be sure to choose the right soil. Your plants will thank you for it!

Photo by Cats Coming on Pexels.com

Easy Plant Care Tips for Beginners

You may think that you just aren’t meant to be a plant owner. Perhaps you end up killing your plant every time you try to have a green thumb. Consistently asking yourself “how can I keep this plant alive?” while cursing into the air. Or maybe you just picked up a plant and want to know what you should do.

You may think that you just aren’t meant to be a plant owner. Perhaps you end up killing your plant every time you try to have a green thumb. Consistently asking yourself “how can I keep this plant alive?” while cursing into the air. Or maybe you just picked up a plant and want to know what you should do.

I started out thinking I was horrible with plants. That I could never be the person with a bunch of beautiful hanging greenery in my living room. Always thinking “how much do I water?” or “does this orchid need nutrients?”

I started out thinking I was horrible with plants. That I could never be the person with a bunch of beautiful hanging greenery in my living room. Always thinking “how much do I water?” or “does this orchid need nutrients?”

I’ve also talked to so many different people who just stopped trying because it seemed like too much.

So unless you are buying some rare finicky plant. You can do it. Have you ever thought you may be doing too much?

Stop Watering Your Plant Every Day

If your first step to plant care is watering it every day. STOP… Your plant most likely does not need to be watered every day. In fact, I can get away with watering some of my plants once a week or week and a half.

I know it’s time to water when the soil is dry. At least this goes for a lot of my plants. I treat my Monsteras, ferns, Alocacias, and other like this. They sometimes look a little thirsty and I make sure to soak the soil completely with water to fill that need.

Heck I have some String of Pearl, and two orchids that are healthy by just being in the bathroom shower mist.

My point is that; your plants will tell you when they need water. They won’t just die instantly.

On the other hand… If you water your plant too much it can lead to root rot, and fungus growth which can be a pain to get rid of.

A lot of people think that you need to water every day. Just avoid doing it. Set a reminder on your phone or something to check the soil dryness twice a week to start off.

Here is my article about overwatered plants in case you suspect it has been overwatered.

How To Know When Your Plant Is Overwatered: What To Do.

Another common issue with overwatering is dealing with powdery mildew which I wrote about below.

Identifying Powdery Mildew: Treat in a natural way

Let there be light

If your plant is recommended to have indirect light. It doesn’t mean keep it in the shade or closet. You can put your plant behind light curtains, or in the open. Just don’t let it get blazing direct sunlight all day. I have been able to tell when my plants get too much sun usually when the ends of their leaves get a bit crisp.

Don’t be afraid to find a spot that your plant loves.

I have one plant that hated to be moved. Every single time I moved it, the leaves would droop and it would look sad. Until I found the spot for it. It took some experimenting but it was worth it and now it’s thriving.

Don’t give up on your plant

You may be asking yourself “is this plant ever going to come back to life”. I say, give it as much of a chance as you can.

I had an alocasia in the corner of my office. It started dripping black stuff out of it’s leaves. Every part of it looked dead besides the little stem that was poking out. I didn’t water that plant for months. It was in the worst unlit area of my office.

One day I walk in, and what do I notice? About 5 little things poking up from the soil. Over the next few days, they grow exponentially.

I have no clue how that plant survived but it is a miracle plant, that survived against all odds.

My point is. Don’t give up on your plant until it gives up. Because it may just be your own miracle plant.

Have fun, Don’t get discouraged

Being a plant parent shouldn’t be a stressful thing. Plants are supposed to make your space look comfortable, and relaxing. Don’t get upset if it doesn’t work out the first time.

Start out small, don’t go overboard. Once you know how to take care of one or two plants, get another.

Don’t be afraid to experiment. Whether it’s with different areas in the house, or perhaps supplemental lighting. If your plant doesn’t like what you are doing, it will tell you. And then experiment some more. If worse comes to worse, you have to get another plant and try again.

But please… Stop overwatering your plants as the first sign of an issue.

How to increase Humidity for indoor plants

Does your plant look sad? Is it wilting, maybe looking slightly crusty on the leaves? Your plant may be suffering from what we would like to call “Lack of humidity” Don’t let this alarm you. There is no need to call a doctor, or even a therapist.

Low humidity can be a simple fix, that may not require you watering your plant more (which may actually hurt it). Stop overwatering your plants people.

But what if I don’t know all of the signs of low humidity for plants? One may ask…

Signs of low humidity in plants:

  • Brown tip/ Curling edges on leaves.
  • Leaves looking like they are drying out in general
  • Wilted look

Note: that sometimes it is hard to tell whether your plant is under watered or doesn’t have enough humidity. In my opinion increasing it’s humidity first and then seeing the reaction is better. Rather than over watering, which may do more harm if you are wrong about what the issue is.

What you can do for humidity problems:

Humidity Tray

Photo by EKATERINA BOLOVTSOVA on Pexels.com

Misting Bottle

These are pretty simple in what they do, some have pebbles some don’t.

Personally I prefer ones with pebbles, this is because it can prevent root rot by keeping water slightly away from the roots if they start coming out of the pot.

These are normally cheap, and easy to get ahold of. Using them as a first step in trying to fix your humidity issue may be a good first choice rather than going with the more expensive options.

Please note, that unglazed clay pots typically suck moisture out of the soil faster than other options. Please take note of that.

Photo by cottonbro on Pexels.com

Another affordable option would be to simply mist your plants if they are a plant that is able to handle the mist. most are just check in case.

You generally will want to avoid water pooling into leaves which could promote mold, another area where to avoid would be near the stem if the water can collect in there.

Combining a humidity tray, with some misting could help tremendously with your humidity issues.

Bathroom

Photo by Ksenia Chernaya on Pexels.com

Humidifier

There are other ways that you can increase the humidity for your plants and not really have to do anything but move them.

This would be bringing them to your bathroom. A lot of the time this can be a quick easy no cost solution to the humidity issues you may be facing.

In a lot of areas during the winter, most parts of peoples houses tend to lose humidity either due to fires, or heaters that kill the humidity. So if the weather is getting colder and you are noticing your plants suffering from the symptoms above. Try moving it into the bathroom. Also, orchids tend to thrive in bathrooms from my own experience.

Photo by cottonbro on Pexels.com

When worse comes to worse in the humidity problems of plants. Maybe you just have too many plants to do the above suggested things for.

This is when I would suggest a humidifier. A lot of humidifiers can read the rooms humidity levels. They are generally automatic.

You can usually find some good humidifiers online that won’t break the bank either. So if you just want to relax and not have to put misting your plants on the list of things you already have to do, this is what I would suggest.

Humidifiers can also be good for stopping the stuffy nose, or cracked lips in the winter which is just an extra added bonus.

One last note about the humidifiers. You will want to do maintenance sometimes in order to check for mold. Because it holds water inside of it, you could get some mold growth, which is easy to take care of if it does happen.

Identifying Powdery Mildew: Treat in a natural way

Learn how to Identify, and treat powdery mildew easily.

So you notice your plants leaves are curling a little bit. Maybe you see think someone sprinkled powdered sugar all over your plants, but I highly doubt that. You should rule out mealybugs which is one of the pests I talk about in another article.

However you still have a problem. Good thing for you, powdery mildew is not really a death sentence for your your plants, just a major annoyance but it shouldn’t be ignored because it can get worse. Getting powdery mildew is important not only for saving the amount of headaches.

Identifying Powdery Mildew

with powdered mildew, you will most likely see some white powder on your leaves or around the stem area. It may look like if there was water spots on your leaves that dried into a fine white powder.

Another symptom can be curling leaves, and discoloration. This can lead people to think that there is a nutrient issue, this is more common further into an infection when it tends to be more severe.

Some leaves may curl up and fall off at a further stage of infection.

How does powdery mildew happen

Considering that powdery mildew is usually various fungal spores, which can lay dormant and start spreading once the conditions are better for it to spread.

A powdery mildew infection can start from bad air flow, bad lighting (to little), bringing in a new plant that is infected, even walking into the room with spores on your clothes from outside could do it.

Another factor is high humidity ranging from around 60-70% and higher. High humidity often can lead to fungus/mold issues if they are presented into the environment mixed with other negative factors. That is why it is important to have some air flow and proper lighting.

Note: make sure whatever you have to do with the plant that you are careful, because the spores can transfer very easily.

Treating Powdery Mildew

Isolate your infected plant from your other plants, carefully cover the plant if you are able to so that the spores don’t get released into the air. Be careful when you move the plant, because the spores are very sensitive and can spread very easily.

Either pinch the affected leaves, or areas such as a vine on an English Ivy that is infected. If you have to use any gloves or tools, make sure you wash them or sanitize them in order to kill the spores afterwards. You don’t want to accidentally re introduce the spores.

Tip for trimming: You can also use cinnamon after you pinch or cut on the areas, because cinnamon has antifungal properties, so it helps prevent infection, and can lead to boosted growth from previously clipped areas to boost the possibility of growth as well.

You can use either a spray or something like neem oil. Just be careful with neem oil and too much light because neem oil can lead to certain plants burning easily from light sensitivity.

If worse comes to worse, and you really have to. You can use a spray that will help with the issue, just make sure you research if what spray you will be using is okay for your plant.

Improving aspects that caused the problem will help you longer term. This can be increasing air flow, giving the room proper lighting, or decreasing the humidity if there is too much.

If you want more tips:

Honestly there are products out there that I could easily pump out. But I think that the best bet to prevent this stuff is making your environment a good environment. If you are curious about what I think are good things that make owning indoor plants easier you can check out my post on Indoor Plant Tools to make your life easier.

Don’t miss out on useful articles in the future by joining my mail list to keep updated.

Processing…
Success! You're on the list.

Thank you again for reading,

-Plant Dummy

How to get your beautiful orchid to bloom more often.

By – Plant Dummy

You know how frustrating it is when you cant seem to get your orchid to bloom? Or when you think that you are not really sure what you are doing wrong? I have been there, felt that way many of times. It’s not fun, so I wanted to tell you you what works for me.

There aren’t many things that feel as good as when you see your orchid opening up and you get the beautiful bloom that happens about once a year for about six to ten weeks. So I hope that what I have to say can help you at least a little bit in some way.

Have you ever had issues getting your moth orchid to bloom? Or perhaps you are asking yourself if there is a way to get my orchid to potentially bloom a little more often. Now my opinion is that there is a bit of knowledge and for the plants sake, luck to be involved to have longer and potentially more frequent blooms.

If you want to entice your moth orchid to bloom, or bloom more often you are going to have to create an environment that allows for it. This means having your orchid in an optimal setting in order to maximize the potential for blooming.

Picking the right pot for your orchid

Picking the right pot is a very important part of having an orchid. Some people choose to not have a pot, and root them on pieces of wood. However for most people, you would be picking a nice pot.

The best pot for an orchid is mainly going to consist of it being able to get rid of excess water. Standing water for the orchid root system is really bad. It can lead to root rot, which can be hard to notice until later stages if the majority of roots are under sight lines. If you are looking for orchid specific containers they will normally have many holes, sometimes even on the sides. The holes allow for that drainage as well as air flow.

You can also use the holes in the sides to do root checkups to make sure they aren’t experiencing any root rot.

I personally really like a glazed pot that have designs for the holes. A shiny earthy look is something that really pops with the bloom of an orchid for me. Another type I like is a terracotta type holder, but you do have to make sure that it drains enough because a lot of regular terracotta doesn’t have holes in the sides from what I have seen.

How to choose good lighting for your orchid

A good consistent spot is going to be crucial for a moth orchid to be happy, and healthy. Moth orchids prefer indirect light as opposed to direct light. Direct light can be too much for the moth orchid and create burns on the leaves.

Photo by Maria Orlova on Pexels.com

Not enough light can also prevent the orchid from blooming, or slow blooming down. So you will want to find a good balance and adjust slightly here and there to get it perfect. Light green leaves will be a decent key to knowing if your plant is happy or not. Yellowing leaves in spots is a sign that it may be getting burned.

What Humidity and temperature does my orchid need?

When you wake up it’s cold outside, your house is a little bit colder than normal. Do ever just want to stay wrapped up in your blanket? Well that can be similar to how your orchid may feel when exposed to the wrong humidity and temperature.

The winter generally has less humidity because it is cold

For the temperature you will want to keep the area around 70 during the day and around 60 at night (55 is about as low as they will want to go). Too cold of temperatures, and constant temperatures over 90 can definitely stress the orchid out. Drastic changes in the temperature beyond like 20 degrees can also stress the plant out as well. It would not really know what is going on or how to react.

As far as humidity goes, orchids like it to be from 40%-70% humidity. This gives you some options, I honestly prefer orchids to be where there is no question of humidity, and that would be the bathroom for me. Particularly because I have a skylight that gives them plenty of indirect sunlight. If you don’t have room in your bathroom, or just don’t want them inside your bathroom, you have some options.

Tip: Air circulation is good for your plants and you. It gives you both fresh air, and gets rid of the old air. Just make sure it isn’t hurricane force wind, because that won’t be great.

One option may be a good option for you is to get a clay pot that has a humidity tray built. Or if you don’t want to transplant your orchid, you can get this humidity tray. It’s subtle, looks sleek and would go with most pots, and it’s pretty affordable.

Click here to see this tray on Amazon

Another option is a humidifier, this is for more of setting in rooms where the humidity would generally be lower but you want your plants there. This can be good if you have some plants that like higher humidity, not just orchids. These are also nice if your nose tends to get dry during the winter when you sleep, but that’s really just a bonus.

Click here to see this humidifier out on Amazon.

I may get commissions for purchases made through links in this post.


Watering your orchid

Another crucial part of having a healthy orchid is making sure it is watered correctly. I like misting the roots. Using a mister for watering the roots allows for you to spray the roots with less risk on having water spray into the crown. At least this is something that works for us.

You also really want to avoid getting standing water on the leaves, as well as avoiding water getting into the crown (where the leaves kind of create a cup looking area). Water standing on leaves can lead to damage, or infection on the plant.

If you are interested in a mister you can check this one out on Amazon which comes in different colors. These are low cost but tend to last if you use care. They look a lot better than a plastic spray bottle in my opinion. The nozzle is elongated allowing for you to get the mist where you want it.

Click here to buy the mister on Amazon

I may get commissions for purchases made through links in this post.

Tip: Overwatering is more dangerous to your orchid than underwatering. I think of it like adding salt to a dish. You can always add more salt, but if you add too much salt at the beginning the dish is ruined.

Choosing proper soil and fertilizer for your orchid

Choices, choices, choices. There are almost too many choices when it comes to choosing a medium for an orchid. You will want to avoid just random potting soil. Various brands produce specific orchid potting mix.

Usually these mixes contain some variance of bark size, which will allow for easy draining of the water. It might also contain some moss or pearlite as well.

At my house, we have I think 7 orchids off the top of my head. Currently we are using the “Miracle-Gro; Orchid Potting Mix Course Blend”. We haven’t noticed any issues as far as stagnant water or root rot with it. They also give a pretty helpful reminder on the back of the bag. It is also really affordable.

As far as fertilizer or “plant food” my girlfriend and I have been using “Miracle-Gro Orchid Plant Food Spikes” and I haven’t noticed any negative effects. I really like it because like the potting mix, it reminds you when you should be using it. Both of these are pretty affordable.

If you want an Orchid potting mix, and fertilizer without having to make it yourself. Check the “Plant Care Bundle” out on Amazon. Look at some reviews and see if it’s for you. Like I said, this is what we are currently using, and I can’t complain yet.

Click here to see the “Plant Care Bundle” on Amazon

I may get commissions for purchases made through links in this post.

I really hope that this article can help you become more confident on your green thumb abilities. Most of this is trial and error. Figuring out how your plants react to things and reading the situation. You will be able to figure out what your plant needs in no time.

If you have any questions or if I got something wrong please let me know.

As always, thank you for reading

-Plant Dummy

Processing…
Success! You're on the list.

References and Citations:

Light, the key to successful blooming. (2016, March 27). Retrieved February 18, 2021, from https://www.aos.org/orchids/additional-resources/light-the-key-to-successful-blooming.aspx

Old Farmer’s Almanac. (n.d.). Orchids. Retrieved February 18, 2021, from https://www.almanac.com/plant/orchids

Easy Care Succulents That Look Great.

*Disclaimer – I may get a small commission from affiliate links in this post. I want to recommend things that I think are beneficial and worth getting, adding to the post quality.

Honestly, I think that there are a lot of cool succulents that you can get in the store, garden shop, or your local Facebook plant dealer. They shouldn’t be too hard to take care of, but I wanted to show my favorites and perhaps suggested ones that I would look out for.

The Hens and Chicks succulent:

Hens and Chicks – Plant Dummy

I wanted to use this picture because I thought it would showcase the prettiness of the succulent, but also demonstrate the heartiness and fight the plant has. This was taken today from the side of my house. Yes I know I need to weed, but its been winter and cold.

However I forgot this had even existed to be completely fair as I had a couple growing last year, and thought I accidentally killed it when I cleared the area. There is another pup next to a different one, but that didn’t look as pretty because I think some bugs got into it. I may have to get that pup and bring it inside soon.

Hens and Chickens grow alright in bad soils and horrible conditions. This is because they normally grow in mountain climates. However, they will do best and have a preferred temperature of around 70 degrees. Which is around what most people keep their indoor areas at.

Zebra Haworthia

Processing…
Success! You're on the list.
Zebra Hawathia – Plant Dummy

The Zebra succulent is a pretty common succulent to get in a pack from the store. They may be common, but they look really beautiful and striking when they get wider.

These guys are a bit more particular than the Hens and Chicken, as they don’t seem to do as well in the cold. However unless you are keeping the house below freezing you should be fine. When looking for a spot for this succulent, you should look for a place where it can get some indirect sun.

if you keep your house hotter, you will need to water them more often. But still they don’t require too much water.

You will want to wait until the soil is pretty dry, because Zebra plants won’t do good if you over water them. If you under water the Zebra plant it will usually make the leaves look kind of saggy. You also will want to soak the soil all the way through, then wait until it feels dry again before watering. Don’t worry if it isn’t growing enough for your liking. These take a lot of time to gain some growth.

Echeveria Succulent

Echeveria – Plant Dummy

There are so many different types of this plant it will have you amazed (150 types). There is a hue of color that would make anyone happy. That is probably one of the reasons they are so popular.

You will want to have the Echeveria in a pot that will allow for drainage, as you will want to avoid having moisture stick around for too long, because they are desert plants. This is good for you though because if you plan on keeping them inside, like the other ones. I would assume they would be warm enough.

The Echeveria plants are also slower growing plants. You can’t expect them to grow over night, or even over the month much. Patience is key for succulents. As long as you aren’t killing them, you are doing something right. Watering succulents properly is one of the more important things in keeping them growing healthy. for the Echeveria you will want to make sure that you keep from over watering. You can do this by letting the soil get dry before you water again, allowing for the roots to have a break, remember these are used to desert like conditions.

Bonus to the Echeveria: is that like a lot of other succulents. They produce pups, which you can propagate. This is like getting a bonus for doing a good job.

Burro’s tail

Photo by María Álvares de Carvalho

I have a Burro’s tail, and it wouldn’t be plant dummy if there wasn’t a nice looking plant that can be in a basket and hang.

Burro’s tail, Donkey tail, or Sedum Morganianum. Whatever you prefer to call it, is pretty darn easy to grow. It also looks wonderful spilling over the pot/ basket it is being held in.

These things are pretty hard to kill, so as long as you are keeping a decent eye on when to water it, and being careful to just focus on watering the soil in a pot that allows for drainage. You should do alright. You will however want to be careful when you move the plant. The leaves are going to want to come off easily. Just try to avoid it. I personally think that losing at least one is most likely inevitable unless you are sliding it.

Aloe Vera

Photo by Jude Smart on Unsplash

Look, Aloe has made it once again as a strong contender in the plant world. I don’t pick it for just no reason though. For me I think that I choose Aloe because of the factors that it is pretty hard to kill, looks pretty, and has uses for skin, as well as eating if prepared properly.

My sister and I were talking the other day, and she was wondering how she was killing her Aloe plant. She wrote it off as just being a dead plant. In the next few weeks, it started showing signs of life and was once again happy to be back as well. They are pretty amazing plants.

You will want to pick a pot that allows drainage so the soil can dry out and give it the feeling of it’s natural habitat. Indirect sunlight is preferred for the Aloe Vera. Indoor temps that are comfortable to humans are going to be comfortable to the Aloe as well. Just try to keep it above 55, and below 80 degrees. When you water, make sure that you get the soil watered. Then allow for the soil to dry out before watering again. For succulents you really want to avoid root rot, and by allowing for the soil to dry, you are taking a precaution.

If you are unsure of what kind of succulent you should get. You can get a sample pack. They are generally pretty cheap, and normally have some easy to care for succulents inside of them. If you want to browse a cool place that has a pretty big variety of sample packs and you live in the U.S you can check out SucculentsBox.com

The succulents are placed at a pretty good price as well. Similar to what I would pay at a store, but I get a bigger option which is really refreshing. Below is my referral link, so if you want to just check it out I think you would like the variety too. They are really cool.

Another nice thing about SucculentsBox.com is their policy for quality. If your plant gets really damaged or there is something really wrong with it they cover a lot of issues from root rot to visible damage to pots/planters even infestations. That was something that I was curious about when I first read up on this company because I wasn’t sure how they would offer it, because obviously there can be issues when it comes to shipping a plant.

Bonus tip: Okay this really isn’t a bonus tip, I just wanted to mention again how important it is to get your watering down for succulents. Don’t drop water in the middle of your succulent, or else you are going to get some issues. Don’t use the pot as a bucket for water, let it drain and get dry. Avoid root rot by allowing the soil to dry out.

Thank you for reading the article, it means a lot. If there is anything that should be updated please let me know. I really do try to get accurate information and useful information. – Plant Dummy

Citations:

(n.d.). Retrieved February 12, 2021, from https://www.gardeningknowhow.com/ornamental/cacti-succulents/burros-tail/burros-tail-care.htm

Old Farmer’s Almanac. (n.d.). Aloe Vera. Retrieved February 12, 2021, from https://www.almanac.com/plant/aloe-vera

Common Indoor Plant Pests -How to Identify, and Eliminate

*Disclaimer – I may get a small commission from affiliate links in this post. I want to recommend things that I think are beneficial and worth getting, adding to the post quality.


There are a lot of different things that can hurt your plants. Pests being one of them. Being aware of those things will benefit you in the long run. This is a list of the more common pests that you may encounter with having indoor plants.

I hope that this article helps you identify, and potentially save you some trouble in the future. I really don’t like pests, I personally find them gross. So I hope for your sake you don’t run into them anytime soon.

Spider mites:

Personally I have had spider mites once before, and they are no fun to deal with. If you have one that exists, then there are probably 10 more that you aren’t aware of. Especially if you start seeing webbing in more than just one spot.

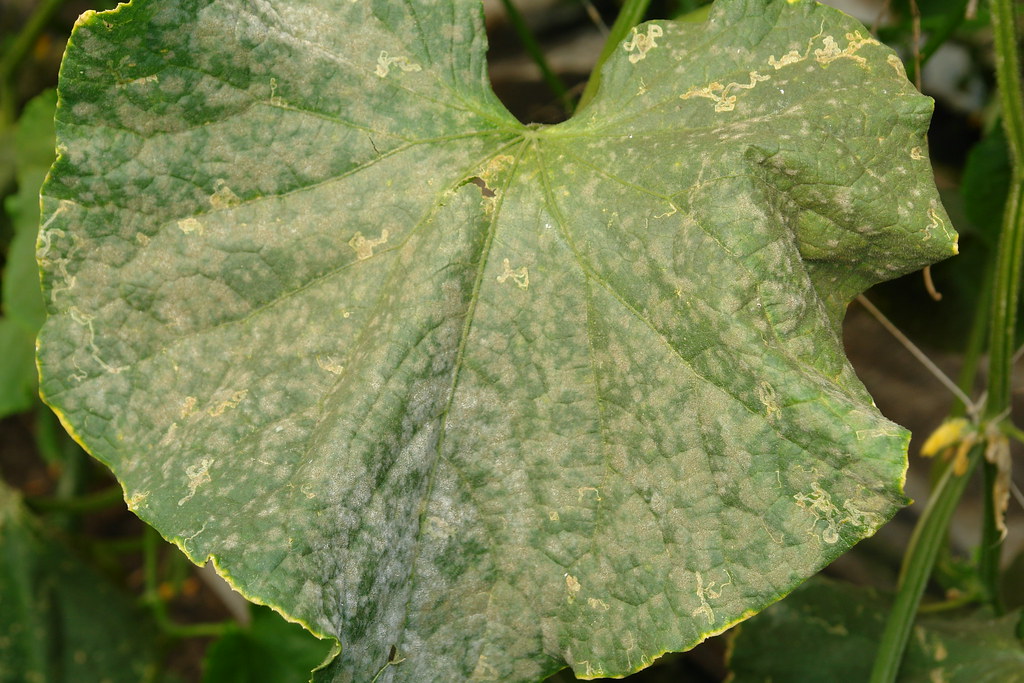
How to spot them: You will usually notice them by either having small little strands of silky web, or tiny little spots on the top part of the leaves because a bugs gotta eat. They look like little specks and on close inspection they kind of look like a slight brown/reddish with 8 legs hanging out on their web.

Once you start seeing more of their webbing then you know there most likely is more than just a couple of them. Also for the sake of your other plants, keep some distance so that they aren’t able to spread to other ones as they try to exchange plants to one that won’t be treated with whatever you decide.

Getting rid of Spider mites: I personally tried putting the plants that were infected outside during the summer and at day time. I don’t know why I did that, but I heard from someone that they can leave and be outside. It seemed like that worked for a minute, but that could also just be coincidence. However what did actually work pretty effectively was the combination of soap water misted on the leaves (it is recommended to use insecticidal soap, or a neem oil extract) and sitting outside.

Neem oil can be a longer term solution for spider mites and some other plant pests. You can check organic neem oil out on Amazon, it is a good price and should last a very long time.

For stronger plants, some may recommend that you can spray the plant with just plain water at first. I would also consider this before reaching for the chemicals, sit the plant outside after on a nice day, and see what that may do to help your issue.

Note: Just make sure that if you are misting your plants, that your plant is okay to be misted with whatever you are putting on it. You don’t want to accidentally stress your plant more than it already will be.

Soft scale insects:

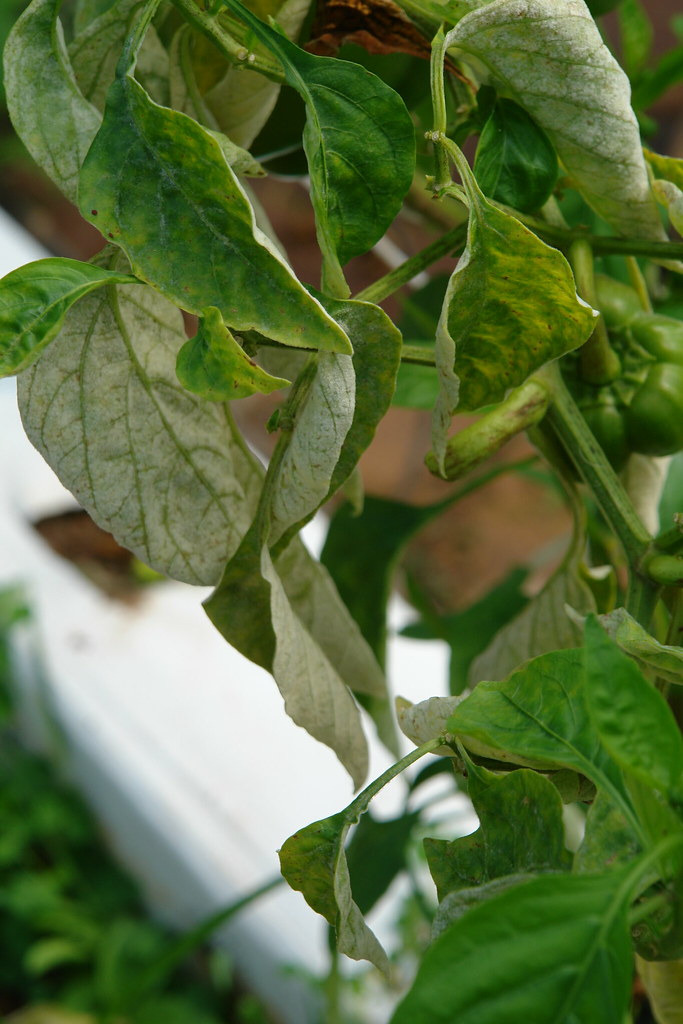
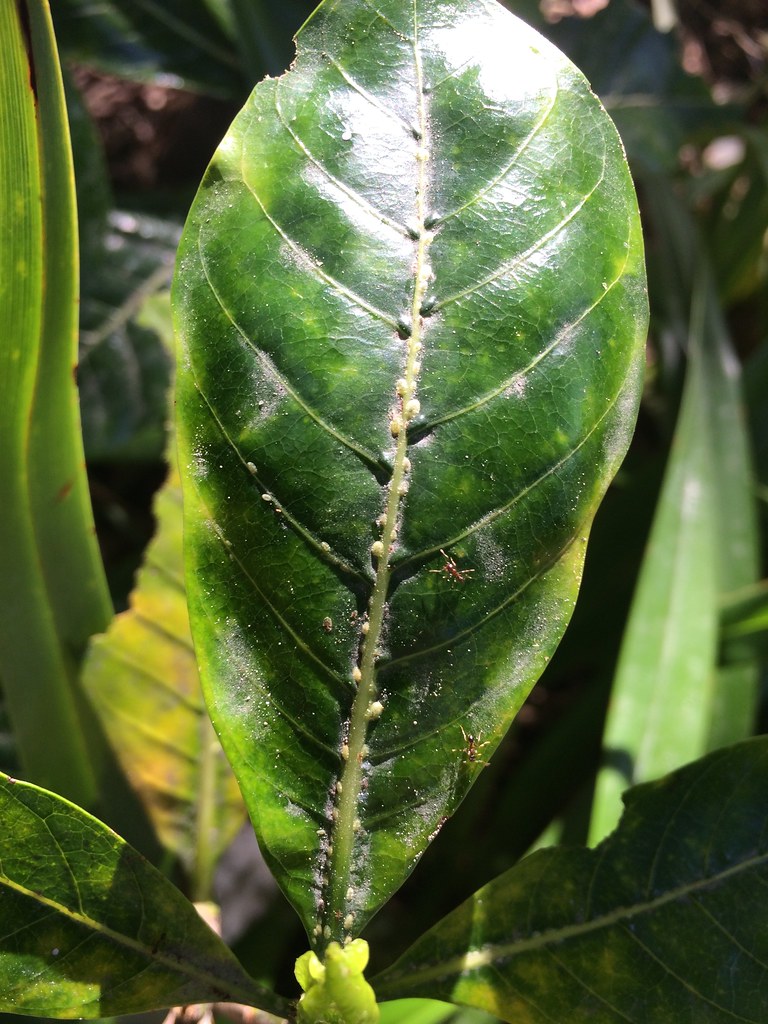
What soft scale insects do: If you look closely, there will be little bumps around the middle of the leaf/ stems of the plant because that’s where the nutrients for them are most abundant. Those bumps are small little soft scale insects. They basically eat the life out of plants because… Well obviously they have to eat to live.

Identifying them: The soft scale insects which vary in colors create little brown spots, or generally discolored spots. These spots seem to be a little bigger than the spider mite spots because they are a bit bigger.

There are soft, and hard scale insects. However the ones that are going to be more of an issue for indoor plants is going to be the soft scaled critters. Unless you are taking your plant outside, and it has a chance to pick one up out there, you probably won’t have to deal with them.

Getting rid of soft scale infection: when you find yourself infected with these annoying creatures. You will want to get your plant away from the other plants to prevent spreading. Then you may want to try the similar approach to the spider mites. Water, and rinsing the plant off if you are able to (considering the plant type) to get the majority of these suckers, no pun intended… Off of your plant. After that, you may want to scrape off any of the ones you can see away from your plant.

Another approach if you must, and they just aren’t going away naturally would be to step it up a bit. This would of course be using indoors insecticidal soap. You want to make sure that this would be the appropriate action depending on your plant. Making sure that the type of insecticide won’t be too harmful to your plant. If worse comes to worse, you may lose your plant, and I don’t want that, but sometimes they are too far gone, so just make sure you are giving your plants the attention they deserve.

Mealybugs (yes it’s one word):

Mealybugs are another type of scale insect, however this one seems to be talked about in a league of it’s own, and from what I can tell has a slightly different way of identifying, as well as a slight way in difference that you may want to treat it.

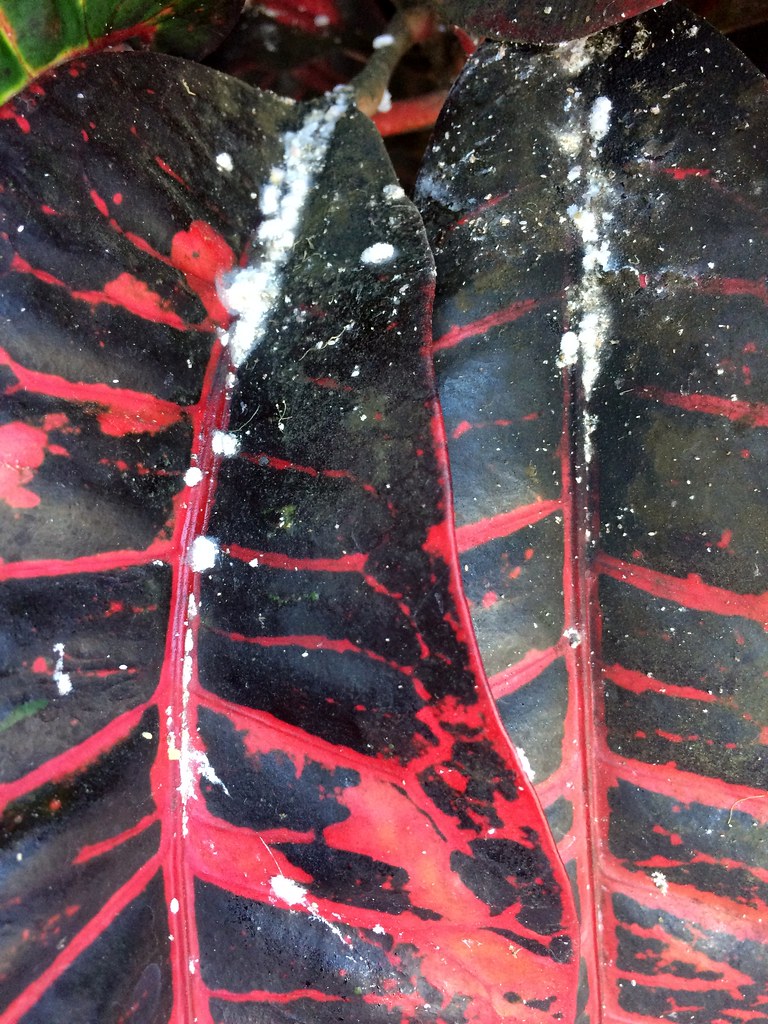
How do you identify a mealybug? Well first off this bug has a weird wax that seems like a powder on its body generally. This weird wax can almost look like little strands of white fiber on your plants leaves. They generally are found hanging out on the underside of the plant leaf as well.

Just like the rest of these pests, they like eating the plant. That is why they are there, so you can probably count on there being some marks of them feeding. Whether it be little spots, yellowing or death of a leaf at first.

Getting rid of Mealybugs: there is an interesting method of treating these pests can be using a cotton swab and some alcohol on the infestation by dabbing it on. No not your favorite whiskey, you will want to use some rubbing alcohol, this will help with smaller problems. For bigger problems we will want to do like what we did for the other types of soft scale, and use some insecticidal soap, or maybe some neem oil to see if that works.

Again, I would like for you to read if you have to use that type of soap because the wrong one can potentially give harm to your plant.

Aphids:

In my opinion aphids are one of the least ugly pests on this list, however they are equally as annoying. But good thing for you is that they are easily identifiable as well as pretty easy to kill.

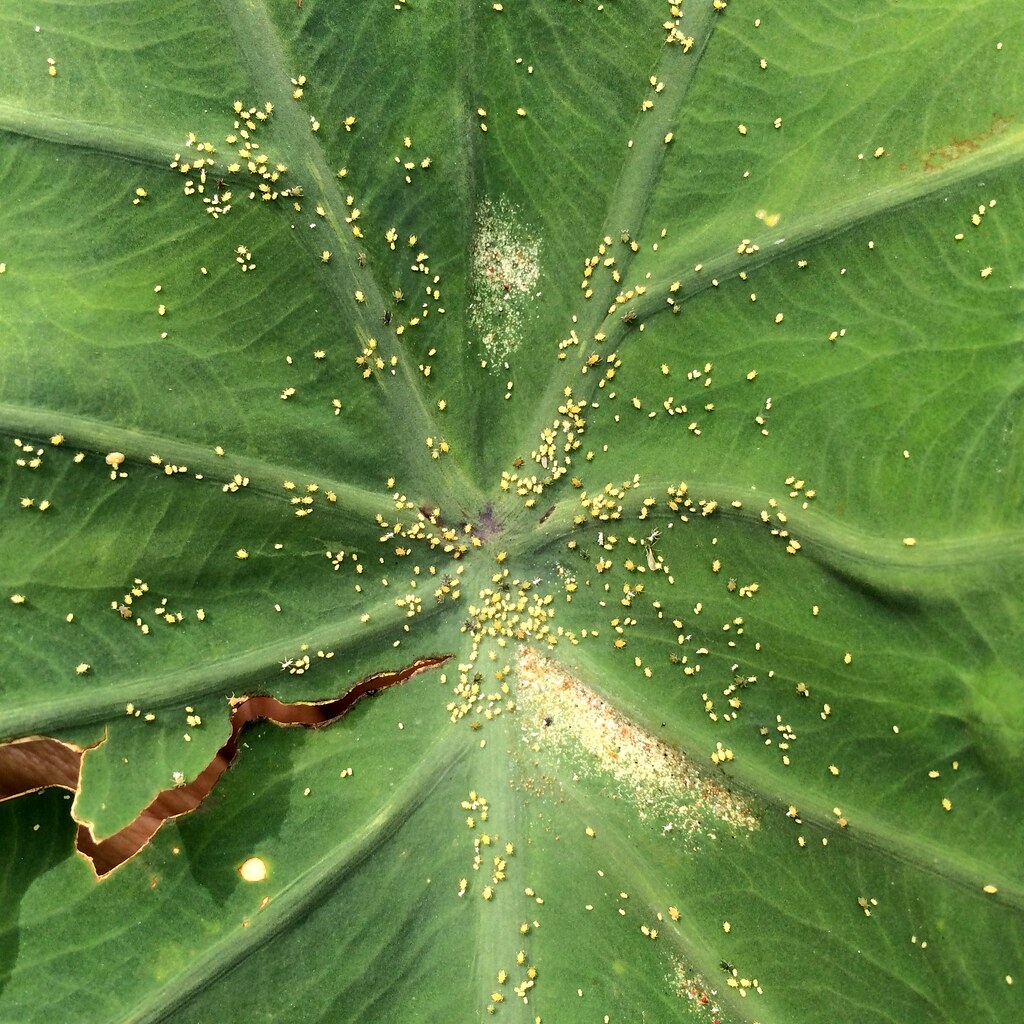
Identifying Aphids: Aphids have fat bodies, and skinny heads. They like to crawl around on the plant grazing upon its juiciness.

They are generally greenish in color, however they can have a white tint to them as well. However some Aphids are able to fly, so don’t be surprised if you see a pair of wings. Aphids can grow on the droppings that the Aphids leave behind which is what some people tend to see as the first introduction to the Aphid infestation.

Fun fact: Aphid droppings are called honeydew, because it is sweet. Sometimes it will even attract some ants to come by and eat it.

How to deal with Aphid invaders: Making sure you are paying attention to your plants is a common theme here. Once you notice them you have to make a judgement call of how bad it is. If there are only a few, you may be able to use neem oil or an insecticide soap. 

But for people who want to try something natural, you could look into using a water vinegar spray. I personally never have had the issue of Aphids, but I have seen in different areas where it can be suggested. Make sure your plant can handle that though, as vinegar can be strong.

General notes: I understand you can’t be watching your plants all the time, but if you keep at least somewhat of an eye out this will help with reducing the pain you may have in the future. Either from an infestation, or maybe just general issues with your plant. I know that when I had issues with my plants, it has been because I either neglected them for too long, or didn’t keep enough of an eye on them to see who was moving in on them. I just noticed that preventative care is better than reactive care, and it tends to be a lot easier.

And as always, if you believe there is something that needs to be changed, please let me know. I am more than willing to look into it and improve the article. I don’t want to spread any false ideas, thank you for reading.

Reference/supplemental information gathered:

Scale insects – indoor plants. (n.d.). Retrieved February 08, 2021, from https://extension.umd.edu/hgic/topics/scale-insects-indoor-plants#:~:text=Heavily%20infested%20plants%20should%20be,for%20use%20on%20indoor%20plants.

Scott, O., Scott, J., & Williamson, J. (2018, August 08). Common houseplant insects & related pests. Retrieved February 08, 2021, from https://hgic.clemson.edu/factsheet/common-houseplant-insects-related-pests/

Mealybugs – indoor plants. (n.d.). Retrieved February 08, 2021, from https://extension.umd.edu/hgic/topics/mealybugs-indoor-plants

Aphids. (n.d.). Retrieved February 08, 2021, from https://entomology.ca.uky.edu/ef103#:~:text=Aphids%20are%20soft%2Dbodied%20insects,undersides%20of%20tender%20terminal%20growth.&text=Saliva%20injected%20into%20plants%20by,a%20few%20aphids%20are%20present.